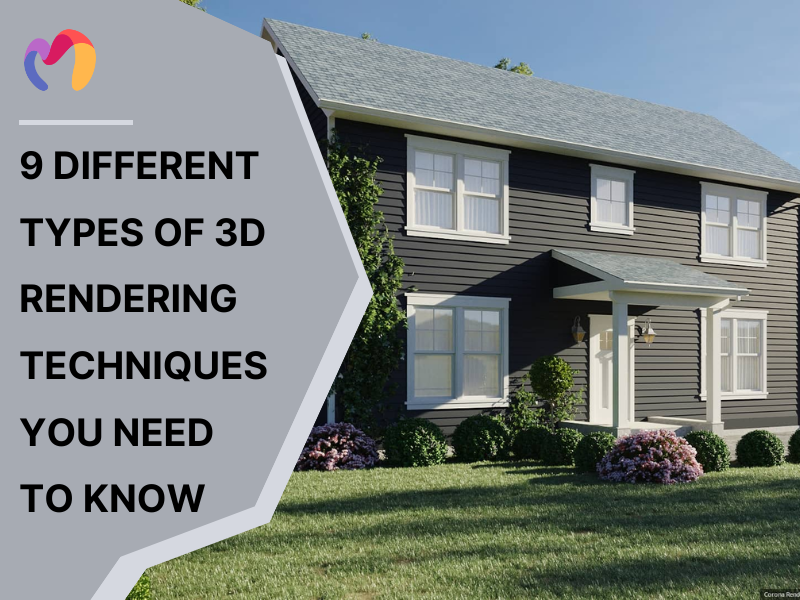
9 Different Types of 3D Rendering Techniques You Need To Know
Update: 29/10/2025
3D rendering techniques are methods that transform 3D models into 2D images or animations, simulating light and material interactions to produce realistic or artistic visuals. Architects, designers and engineers utilize these techniques to transform ideas into precise visual presentations. This article outlines nine key rendering approaches that suit various design needs across residential, commercial and hospitality projects, from photorealistic renderings to stylized conceptual visuals. By understanding these methods, design professionals can communicate concepts effectively, enhance client presentations and select the best rendering style for each project’s purpose, combining clarity, creativity and practical insight.
1. Rasterization
Rasterization is a rendering method that converts 3D models into 2D images by transforming vector graphics into pixel-based visuals. It’s widely used for real-time architectural presentations, where speed is essential.
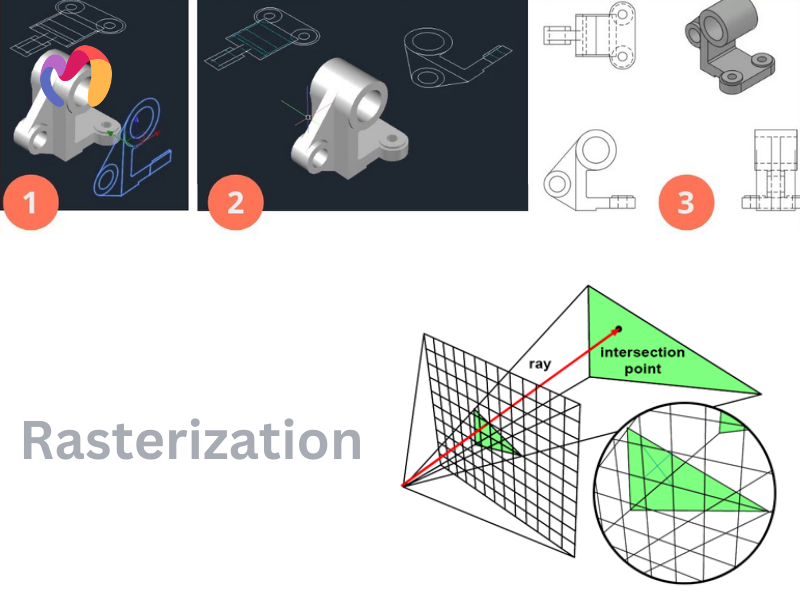
Rasterization efficiently transforms 3D models into pixel-based images by breaking them down into polygon meshes. This method enables rapid processing and real-time visualization, making it ideal for interactive walkthroughs and large-scale projects. It integrates seamlessly with texture mapping and geometry processing to deliver smooth and effective renderings, even on hardware with limited computational power.
Significant Advantages:
- Real-time rendering for interactive walkthroughs.
- Smooth texture mapping and minimal hardware demands.
- Fast design iteration capabilities.
Disadvantages:
- Limited accuracy in lighting and shadow calculations compared to ray-based methods.
- Less realistic reflections and refractions, especially for complex materials.
- Can produce artifacts like aliasing and z-fighting in detailed scenes.
- Struggles with advanced visual effects like caustics and global illumination.
Common Applications in Architectural Design:
- Early design stage reviews.
- Client presentations requiring immediate feedback.
- Virtual navigation of large architectural spaces.
2. Ray Casting
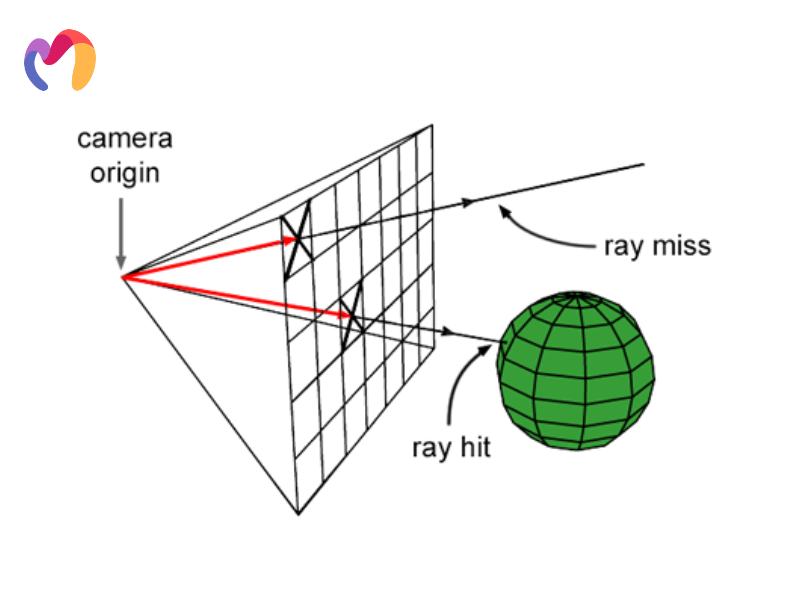
Ray casting traces the path of light as it interacts with surfaces, providing accurate visualizations of lighting and shadow in architectural spaces.
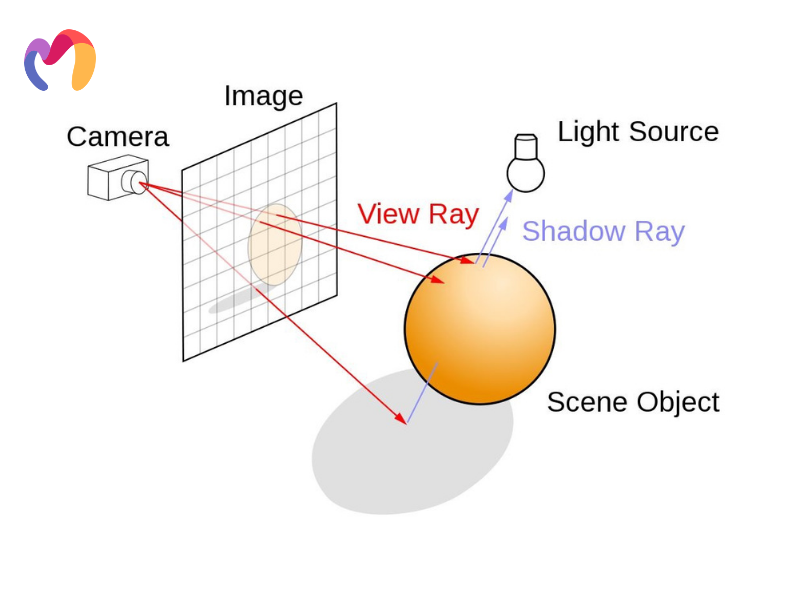
Ray casting simulates the behavior of light by tracing its interaction with surfaces and materials. This 3d modelling technique accurately calculates shadows, reflections and refractions, providing a realistic representation of how light impacts architectural environments. By focusing on a single light path, it balances detail with computational efficiency, ensuring precision in lighting simulations without excessive rendering times.
Significant Advantages:
- Accurate depiction of reflection and refraction.
- Realistic shadows for enhanced spatial clarity.
- Effective for analyzing transparent and translucent elements.
- Comprehensive environmental lighting simulation.
Disadvantages:
- Higher computational demands than basic rasterization.
- Limited to single-bounce light calculations, reducing overall realism.
- Less accurate for complex material interactions.
- Difficulty handling volumetric effects like fog or smoke.
Common Applications in Architectural Design:
- Glass façade and polished surface visualization.
- Daylight studies and window placement optimization.
- Detailed lighting design validation.
3. Ray Tracing
Ray tracing is a rendering method that delivers photorealistic images by simulating light behavior in detail, including reflection, refraction and shadow.
Ray tracing employs advanced algorithms to trace individual light rays as they interact with surfaces and materials, capturing intricate effects like indirect illumination, soft shadows and realistic reflections. This technique allows for detailed and accurate modeling of light behaviors, making it suitable for high-fidelity visualizations in complex architectural scenes.
Significant Advantages:
- Realistic ambient effects and soft shadows.
- Precise rendering of glass, metal and transparent materials.
- Detailed indirect light and color reflections.
Disadvantages:
- Significantly higher computational requirements and rendering times.
- Requires substantial hardware resources for optimal performance.
- Complex setup process for achieving desired results.
- Can be cost-prohibitive for smaller projects or tight deadlines.
Common Applications in Architectural Design:
- High-quality client presentations.
- Visualizing lighting effects in interiors and exteriors.
- Assessing glare and optimizing natural light usage.
4. Interactive Rendering
Interactive rendering enables real-time visualization, allowing architects and clients to explore and adjust 3D models dynamically during presentations.
Interactive rendering handles complex 3D data in real-time, enabling immediate adjustments to lighting, materials and camera angles. This method integrates seamlessly with Building Information Modeling (BIM), allowing architects to test and refine designs collaboratively with clients during live presentations, fostering better decision-making.
Significant Advantages:
- Real-time lighting and material adjustments.
- Immediate visualization of design modifications.
- Improved decision-making with interactive walkthroughs.
Disadvantages:
- Quality compromises necessary to maintain real-time performance.
- Hardware limitations can affect smoothness and detail level.
- Reduced accuracy in complex lighting scenarios.
- Potential for visual artifacts during rapid scene changes.
Common Applications in Architectural Design:
- Collaborative client meetings.
- Design presentations requiring live adjustments.
- Immersive virtual space navigation.
5. Scanline Rendering
Among common 3D rendering techniques, scanline rendering processes geometric data line-by-line for efficient rendering, balancing speed and visual quality in architectural projects.
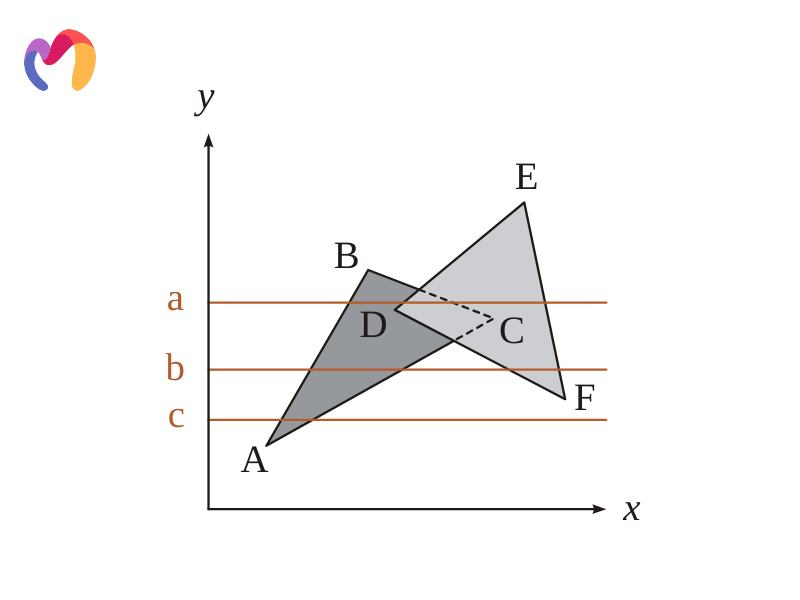
Scanline rendering processes visible surfaces one horizontal line at a time, reducing computational complexity while maintaining visual quality. By focusing only on what is visible to the viewer, it optimizes performance and speeds up rendering, making it suitable for real-time applications like walkthroughs and client reviews.
Significant Advantages:
- Consistent real-time rendering performance.
- Efficient polygon processing for reduced computational load.
- Smooth navigation through complex models.
Disadvantages:
- Limited capability for handling transparent objects accurately.
- Less precise shadow calculations compared to ray-based methods.
- Difficulty managing complex reflection and refraction effects.
- Can produce visible artifacts at object edges.
Common Applications in Architectural Design:
- Design reviews require fast rendering.
- Real-time walkthroughs for presentations.
- Large-scale project visualization with intricate details.
| Explore. Download. Create. Dive into our library of free 3D models now! | |||
 |
 |
 |
 |
| Wall 3d model | Entrance 3d model | Study Room 3d model | Dining Room 3d model |
6. Global Illumination
Global illumination simulates how light interacts with surfaces in a scene, including both direct and indirect lighting, to produce realistic renders with soft shadows and nuanced color transitions.
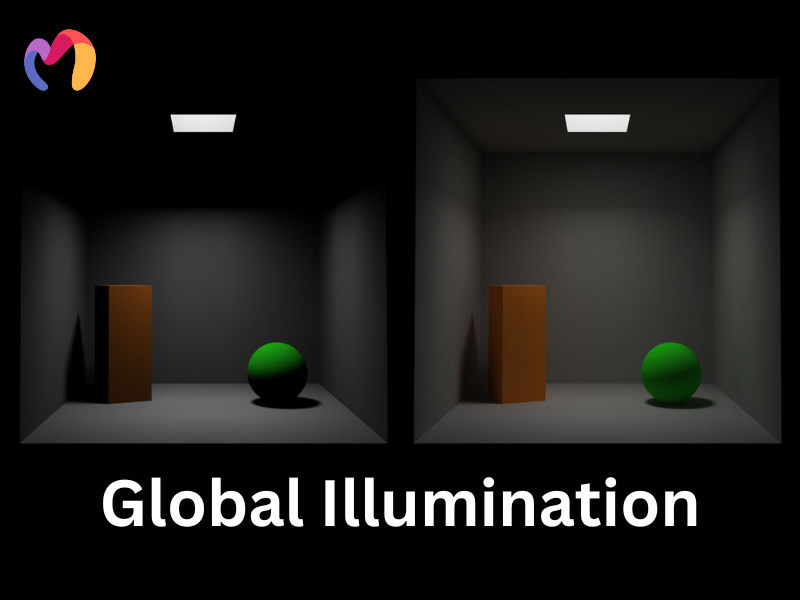
Global illumination calculates light distribution throughout a scene, capturing how it bounces off multiple surfaces to create natural-looking illumination. This 3D lighting technique ensures accurate shading, color blending and shadow creation, making architectural visualizations more lifelike and engaging. It integrates well with other techniques like ambient occlusion for enhanced realism.
Significant Advantages:
- Accurate simulation of natural and artificial lighting.
- Realistic material and texture representation.
- Enhanced visualization of interior environments.
Disadvantages:
- Substantially longer rendering times compared to local illumination.
- High memory requirements for complex scenes.
- Can introduce noise in the final render if not properly configured.
- Requires careful balance between quality and performance configured.
Common Applications in Architectural Design:
- Natural lighting studies for interiors and exteriors.
- Detailed environmental lighting simulations.
- Creating immersive atmospheres for client presentations.
7. Radiosity
Radiosity models how light diffuses across surfaces, focusing on indirect illumination to enhance the realism of architectural visualizations.

Radiosity calculates the exchange of light energy between surfaces, resulting in soft and natural lighting effects. It emphasizes color bleeding, where light reflecting off one surface impacts the color of adjacent ones, creating smooth and consistent illumination across a scene.
Significant Advantages:
- Realistic depiction of indirect lighting.
- Accurate color transfer between surfaces.
- Consistent and natural overall scene lighting.
Disadvantages:
- Extremely computation-intensive for complex scenes.
- Static lighting calculations only, limiting dynamic scene changes.
- Memory-intensive for detailed environments.
- Less effective for non-diffuse surfaces like metals or glass.
Common Applications in Architectural Design:
- Sunlit interiors such as atriums or galleries.
- Spaces emphasizing natural light dynamics.
- Accurate visualization of light diffusion in enclosed environments.
8. Z-Buffering
Z-buffering is a rendering technique that determines object visibility based on depth, ensuring accurate layering in 3D scenes for architectural visualization.
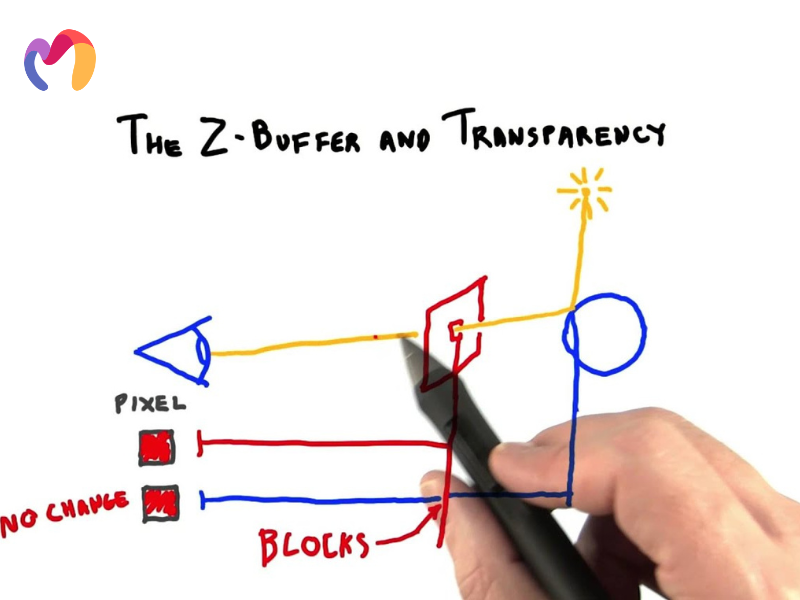
Z-buffering calculates and stores depth information for each pixel in a scene to resolve which objects are visible and which are obscured. This ensures accurate rendering of overlapping elements, such as walls, windows and fixtures, while maintaining efficient performance for real-time walkthroughs.
Significant Advantages:
- Resolves visibility issues in complex models.
- Enhances real-time rendering accuracy.
- Supports seamless navigation through layered designs.
Disadvantages:
- Precision issues with objects very close to each other.
- Memory intensive for high-resolution depth information.
- Can produce visual artifacts in certain viewing angles.
- Limited effectiveness with transparent objects.
Common Applications in Architectural Design:
- Large-scale building models with overlapping elements.
- Real-time walkthroughs of interior and exterior designs.
- Multi-story architectural visualizations.
9. Ambient Occlusion
Ambient occlusion (AO) enhances realism by simulating how ambient light interacts with surfaces, adding depth and subtle shadows to architectural renders.
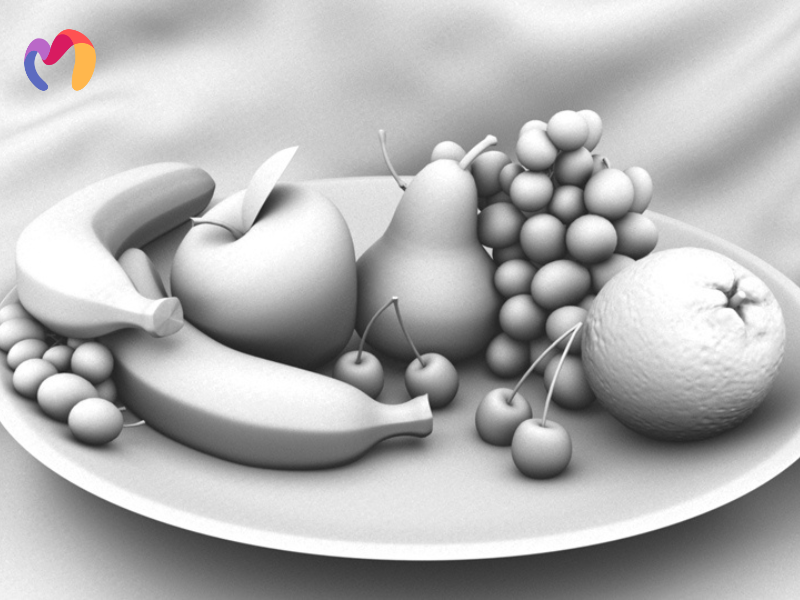
AO calculates how exposed surfaces are to ambient light, creating soft shadows in crevices, corners and where objects intersect. This enhances depth perception and emphasizes architectural details, providing a clearer understanding of spatial relationships within the design.
Significant Advantages:
- Enhanced depth perception through soft shadows.
- Improved spatial clarity and contrast.
- Realistic depiction of light interaction in enclosed spaces.
Disadvantages:
- Can appear unrealistic if overused or improperly configured.
- Additional processing time needed for accurate results.
- May darken scenes excessively if not carefully balanced.
- Less accurate for dynamic objects or changing lighting conditions.
Common Applications in Architectural Design:
- Highlighting intricate details in interiors.
- Creating realistic shadowing for architectural renders.
- Enhancing depth in conceptual design presentations.
10. Tips to Make 3D Rendering Better
Producing a high-quality 3D render requires more than just powerful software. It also demands attention to detail, technical accuracy and creative decisions that enhance realism. Here are 10 practical tips to help you take your visualization to the next level and deliver more convincing presentations:
- Start simple, then add complexity: Build your model with basic geometry first, then layer in detailed elements. This approach ensures accurate proportions and makes it easier to refine later. A clean model not only speeds up the rendering process but also allows for smooth revisions when clients request changes.
- Focus on lighting – the key to realism: Lighting defines both the mood and realism of your scene. Use HDRI maps to replicate natural daylight, then add artificial lights to create depth and highlight materials. For instance, warm lighting is well-suited for interior spaces to create a sense of comfort, while cool daylight complements modern architectural designs.
- Maintain correct scaling and proportions: Even the most visually appealing render will lose credibility if the proportions are off. Ensure that every element, from window height to furniture size, matches real-world standards. This accuracy makes the render believable and helps clients visualize how the space will actually function.
- Invest in high-quality materials and textures: Physically Based Rendering (PBR) materials simulate surfaces such as wood, metal and glass realistically. Adding subtle details—like scratches, dust or worn edges—takes your render from “too perfect” to convincingly real. These small touches often make the biggest difference in professional work.
- Round off sharp edges for natural reflections: Perfectly sharp edges rarely exist in reality. By applying chamfers or bevels, light interacts more naturally, creating smooth highlights and a lifelike appearance. For example, a wooden table with slightly rounded edges feels much more realistic than one with razor-sharp corners.
- Refine composition and camera work: A strong camera angle can transform your render. Apply compositional principles like the rule of thirds or leading lines to guide the viewer’s eye. Add photographic effects—such as depth of field, motion blur or lens flares—to mimic real camera behavior and make the scene more engaging.
- Use real-world references: Don’t rely solely on imagination. Study photographs of similar spaces, materials and lighting conditions to guide your choices. Comparing your render with real-life images highlights areas for improvement and ensures your visualization feels authentic.
- Keep your mesh clean and optimized: Organized geometry and clean topology save rendering time and reduce shading errors. This is especially important in large-scale projects like high-rise buildings or detailed interior scenes, where efficiency and consistency are crucial.
- Avoid overusing post-production effects: While post-production can enhance your render, overdoing it makes the image look artificial. Instead, apply subtle adjustments to color balance, contrast and brightness to maintain a natural look. Less is often more when it comes to realism.
- Blend renders with real photographs (photomontage): For exterior projects, placing your 3D model into a real site photo creates powerful context. This method makes your design more persuasive and helps clients or stakeholders clearly understand how the project will fit into its surroundings.
11. Conclusion
3D rendering techniques cover methods like rasterization, ray-casting, ray-tracing and other advanced techniques that enhance architectural visualization, helping designers translate concepts into clear, precise presentations. By understanding these approaches, architects, interior designers and engineers can select the most suitable rendering method for each project, improving client communication and project development. 3DMaxter supports this process with a vast library of high-quality 3D models ready for interior, exterior and architectural designs. Our curated collection enables design teams to access a diverse range of professional assets efficiently, while maintaining quality and cost-effectiveness.
3DMAXTER LTD
- Email: [email protected]
- Phone: +1 (929) 450-2898
- Address: 95-38 Queens Blvd, Rego Park, NY 11374, USA
3DMAXTER
![]()
![]()
![]()
![]()
![]()
Related Posts
With their diverse designs, dome pendants not only provide functional illumination but also add a touch of personality and elegance to any room. Whatever your preferred style may be, there's a dome pendant to match every taste and complement any interior decor seamlessly.